reading-notes
Django forms
An HTML Form is a group of one or more fields/widgets on a web page, which can be used to collect information from users for submission to a server.
HTML Forms
a simple HTML form, with a single text field for entering the name of some “team”, and its associated label:

Simple name field example in HTML form The form is defined in HTML as a collection of elements inside <form>…</form> tags, containing at least one input element of type=”submit”.
we just have one text field for entering the team name. The field’s type attribute defines what sort of widget will be displayed. The name and id of the field are used to identify the field in JavaScript/CSS/HTML. The matching team label is specified using the label tag (see “Enter name” above), with a for field containing the id value of the associated input.
The submit input will be displayed as a button by default. This can be pressed to upload the data in all the other input elements in the form to the server (in this case, just the team_name field).
Django form handling process
Django’s form handling uses all of the same techniques that we learned about in previous tutorials (for displaying information about our models): the view gets a request, performs any actions required including reading data from the models, then generates and returns an HTML page (from a template, into which we pass a context containing the data to be displayed). What makes things more complicated is that the server also needs to be able to process data provided by the user, and redisplay the page if there are any errors.
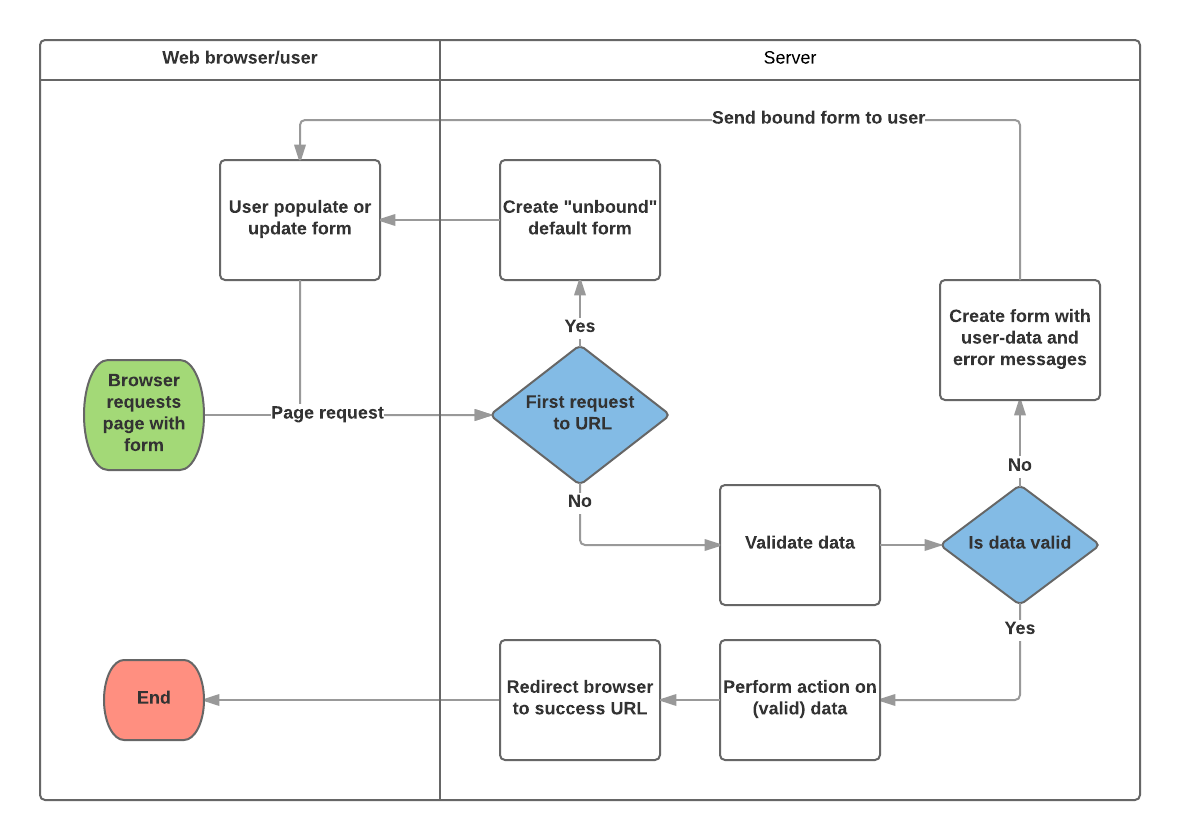
Based on the diagram above, the main things that Django’s form handling does are:
1.Display the default form the first time it is requested by the user.
2.Receive data from a submit request and bind it to the form.
3.Clean and validate the data.
4.If any data is invalid, re-display the form, this time with any user populated values and error messages for the problem fields.
5.If all data is valid, perform required actions (such as save the data, send an email, return the result of a search, upload a file, and so on).
6.Once all actions are complete, redirect the user to another page.
Renew-book form using a Form and function view
we’re going to add a page to allow librarians to renew borrowed books. To do this we’ll create a form that allows users to enter a date value. We’ll seed the field with an initial value 3 weeks from the current date (the normal borrowing period), and add some validation to ensure that the librarian can’t enter a date in the past or a date too far in the future. When a valid date has been entered, we’ll write it to the current record’s BookInstance.due_back field.
ModelForms
Creating a Form class using the approach described above is very flexible, allowing you to create whatever sort of form page you like and associate it with any model or models.
The rest of the information comes from the model field definitions (e.g. labels, widgets, help text, error messages). If these aren’t quite right, then we can override them in our class Meta, specifying a dictionary containing the field to change and its new value. For example, in this form, we might want a label for our field of “Renewal date” (rather than the default based on the field name: Due Back), and we also want our help text to be specific to this use case. The Meta below shows you how to override these fields, and you can similarly set widgets and error_messages if the defaults aren’t sufficient.
Generic editing views
The form handling algorithm we used in our function view example above represents an extremely common pattern in form editing views. Django abstracts much of this “boilerplate” for you, by creating generic editing views for creating, editing, and deleting views based on models. Not only do these handle the “view” behavior, but they automatically create the form class (a ModelForm) for you from the model.